
.png)
.webp)


.webp)


.webp)


In this article
How to Enable Customers to Access Invoices and Statements in NetSuite
📌 When customers lack easy access to invoices or statements, the collections process slows down. Manual follow-ups increase, while customer satisfaction drops. By enabling self-service access through Oracle NetSuite, finance teams can improve efficiency, shorten payment cycles, and reduce back-and-forth communication.
Steps to Enable Customers to Access Invoices and Statements in NetSuite
Step 1: Enable Customer Access and Payment Features

- Go to Setup > Company > Enable Features
- Under the Transactions subtab, check the “Credit Card Payments” box to allow online invoice payments
- Under the Web Presence subtab, enable “Customer Access”
- Click Save to apply these changes
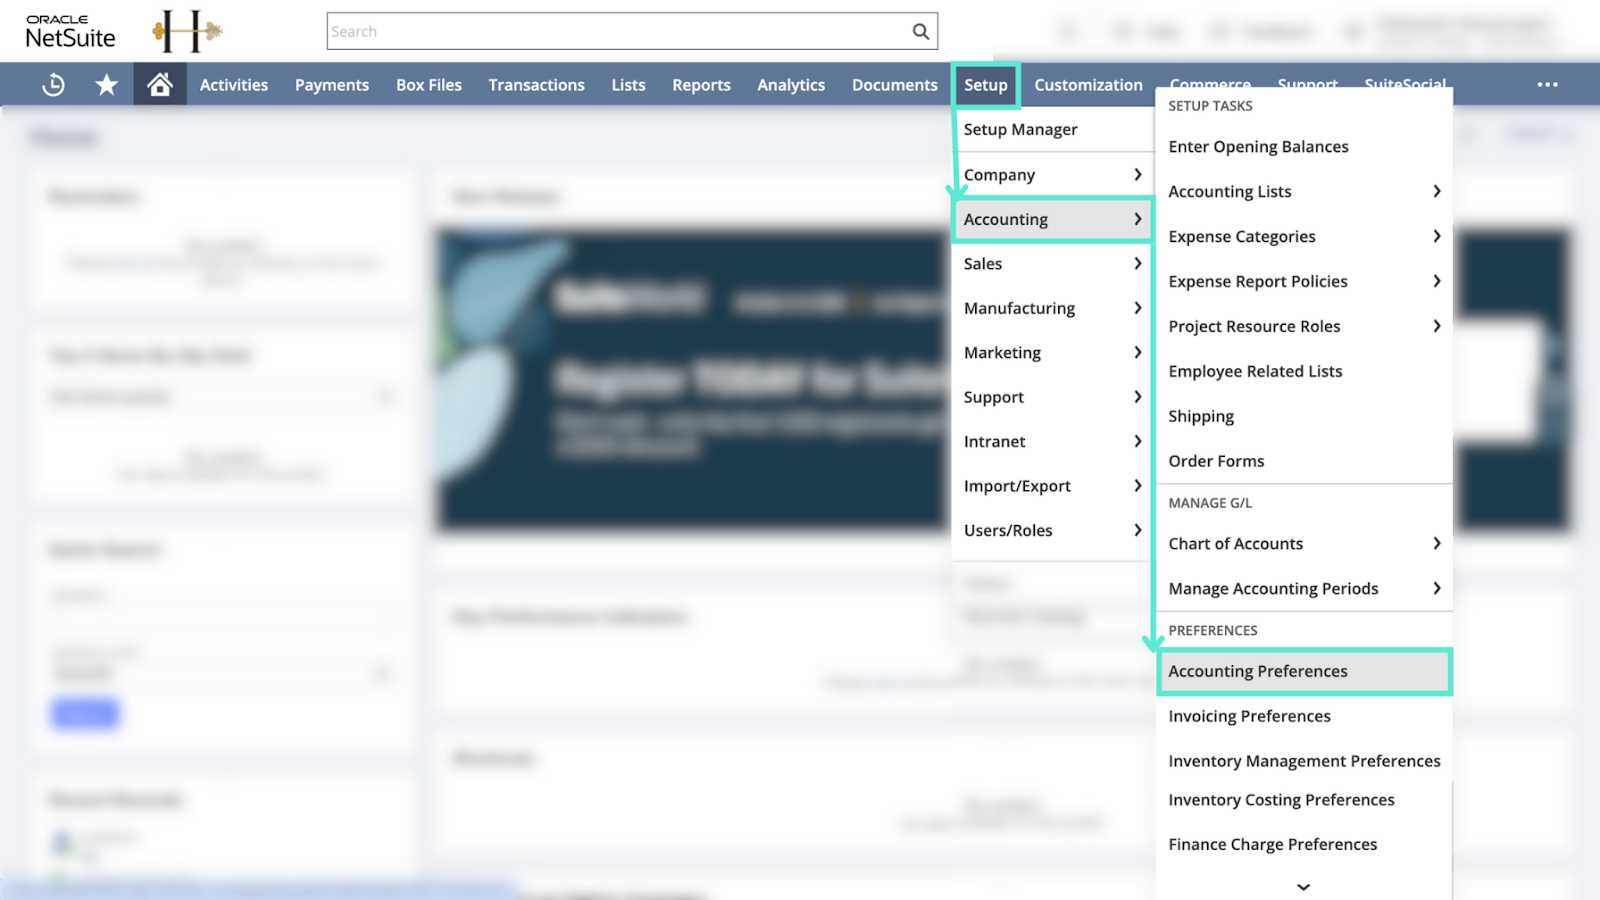
- Then go to Setup > Accounting > Preferences > Accounting Preferences
- Under the Items/Transactions subtab, check “Customers Can Pay Online”
- Save the changes again to finalize the setup
Step 2: Configure Customer Records for Portal Access
- Open a Customer Record and navigate to the Access subtab
- Assign a Customer Center Role to define what the customer can view or do
- Ensure a valid email address is listed for the customer
- Grant login access to invoices, statements, and payment features
- Use the “Log in as customer” option to preview their access after saving
Step 3: Generate and Share Customer Statements
- Go to Transactions > Customers > Generate Statements or use Individual Statements
- Enter the desired Statement Date
- Select the customer and choose a Statement Form, such as the Standard Statement
- Customize the form if needed to show invoice groups or layout preferences
- Email the statement directly from the statement generation page or the customer record
Step 4: Email Invoices and Statements with Payment Links
- Use NetSuite’s Payment Link feature to include payment options directly in the invoice email
- Customize the email template, invoice format (HTML or PDF), and any attachments
- Invoices and statements can also be sent directly from the Customer Record, streamlining delivery
Step 5: Explore Additional Tools and Tips
- Use SuiteApps such as PortalGen to build custom self-service portals for customers
- Track portal usage and customer activity through NetSuite Reporting Tools
- Ensure proper security protocols are in place to protect sensitive financial data
Pro tip: Growfin’s plugin enhances customer management by creating a seamless invoice and statement experience. Customers can access real-time updates, view payment status, and act immediately, helping your team get paid faster. To learn more check out the Bridging the Receivables Efficiency Gap: Going beyond NetSuite webinar!


.webp)
.webp)
.webp)
.webp)